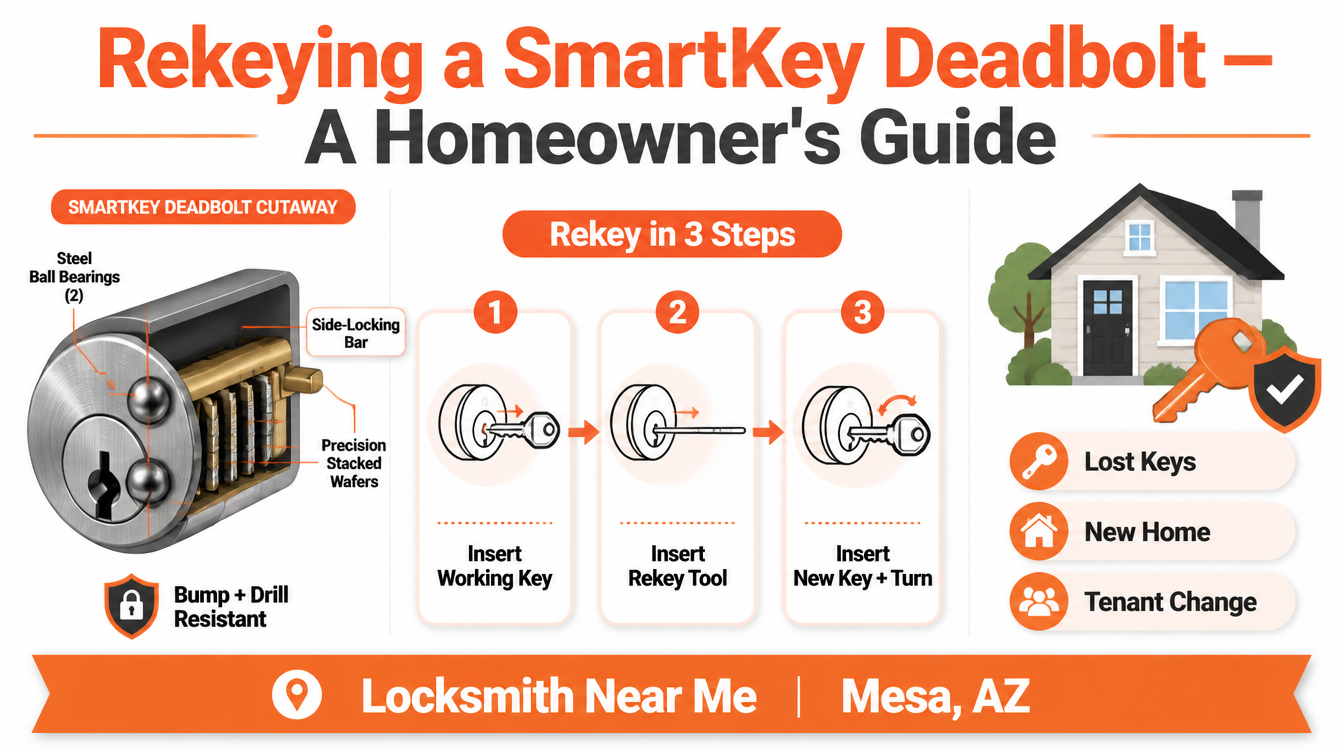
Infographic on rekeying a Kwikset SmartKey deadbolt by Locksmith Near Me Mesa, AZ

Rekeying a Kwikset SmartKey: A Homeowner’s Guide to SmartKey Technology

Rekeying a Kwikset SmartKey resets which key opens your deadbolt without replacing the hardware. The cylinder uses a patented side-locking bar instead of a traditional pin stack, so a homeowner or a locksmith can retire an old key and assign a new one using the manufacturer’s SmartKey tool and the current working key. It is one of the simplest ways to take back control of who can enter your home.

A handed-out spare key you never got back, a previous owner who still has a copy, a roommate who moved out — these are the moments when your front door stops feeling like yours. Replacing every lock is one answer, but rekeying a Kwikset SmartKey gives you the same control while keeping the deadbolt you already trust. As the mobile locksmith service in Mesa that handles these resets across the East Valley, we want to walk you through how the technology works, when to use it, and where its limits are. Keep reading and you will know exactly what is happening inside that little orange-keyed cylinder.

What Is Kwikset SmartKey Technology?

Kwikset introduced SmartKey Security in 2008 as the first do-it-yourself rekeying system on the consumer market. Instead of the brass pin-and-tumbler stack found in most older locks, a SmartKey cylinder uses a side-locking bar paired with sliding aluminum wafers. When the right key lifts those wafers to the correct heights, the bar drops into a channel and the plug turns. Reprogramming the lock simply repositions where that bar engages — no re-pinning, no cylinder removal from the door.

The table below compares SmartKey rekeying with the older pin-tumbler approach our certified technicians still service regularly.

Feature Kwikset SmartKey Security Traditional Pin-Tumbler
Rekeying method Side-locking bar reset with the SmartKey tool Re-pinning the cylinder with new pin stacks
Tool required Manufacturer SmartKey tool Full pinning kit and plug follower
Current working key needed Yes — required to reset Not required (cylinder is re-pinned)
Bump resistance BumpGuard side-bar design Often vulnerable without upgrades
Drill resistance Two hardened steel ball bearings in the face Varies by hardware grade
Master-key capability Not supported Supported via bitting hierarchy
Cylinder material Aluminum wafers Brass pins
Independent certification Meets/exceeds ANSI/BHMA; Grade 1 deadbolts available Grade varies by model
Best handled by Homeowner or locksmith Locksmith with pinning experience

How the Side-Locking Bar Works

In a standard cylinder, spring-loaded pins must line up at a shear line. SmartKey replaces that with a sidebar that reads a row of wafers. The geometry is what makes reprogramming possible: a small internal learning slot lets the wafers “remember” a new key pattern. This is the same principle that makes rekeying your home locks far cleaner than dismantling hardware. According to Kwikset’s own SmartKey Security documentation, the patented design is built specifically to resist picking and bumping.

BumpGuard and Drill Resistance

Two features set SmartKey apart on the security side. BumpGuard counters lock bumping, a method where a specially cut key is tapped to jump pins. Because there are no traditional pins, that attack has nothing to act on. The cylinder also seats two steel ball bearings at the face to improve drill resistance. Many SmartKey deadbolts are tested to ANSI/BHMA Grade 1, the highest residential rating, which you can verify through the Builders Hardware Manufacturers Association. When we install a new handleset and deadbolt, this rating is one of the first things we point out.

How Rekeying a Kwikset SmartKey Actually Works

The process is intentionally short. With the working key inserted and turned a quarter-turn, the SmartKey tool is pressed into the small port beside the keyway. That disengages the wafers from their guide pins. The old key comes out, the new key goes in fully, and a controlled turn teaches the cylinder its new pattern. Once the key returns to the starting position, the lock recognizes only the new key. Kwikset publishes the exact step-by-step rekey instructions for each model.

We see homeowners try this and run into one recurring snag: skipping the full key insertion, which leaves the wafers half-set. That is usually why a self-rekeyed lock “forgets” the key soon after. Our mobile technicians in Mesa carry replacement cylinders for exactly these cases.

What You Need Before Rekeying

You need the current working key. SmartKey is designed so the cylinder can only be reset by someone who already has access — a deliberate security choice. If the only key is lost or was never returned, the lock cannot be reprogrammed through the standard method, and the right move is a cylinder swap or a full lock replacement. When tenants change over, we often pair a rekey with a check of the mailbox locks so the whole property turns over cleanly.

When to Rekey a Kwikset SmartKey

Reprogramming the cylinder makes sense in several everyday situations:

  • Moving into a previously owned home, where you cannot account for every copy ever made
  • A lost or stolen key that may be tied to your address
  • A roommate, tenant, or house cleaner whose access you want to retire
  • Aligning multiple doors to one key after adding matching SmartKey hardware
  • Routine turnover for rental units, paired with keyless access control on the business side

For Mesa rentals and small offices, we frequently combine a residential rekey with exit door panic hardware checks and a fresh set of replacement keys for vehicles in the same visit.

SmartKey Strengths and Limitations Homeowners Should Know

We believe a homeowner makes better decisions with the full picture, so here is the balanced view from our bench. On the plus side, SmartKey resists bumping and drilling, reprograms without tools beyond the included pin, and reaches Grade 1 ratings on many deadbolts. The trade-offs: the wafers are aluminum rather than brass, the system does not support true master keying, and a small number of forced-bypass tools exist for SmartKey cylinders. Independent professional groups such as ALOA Security Professionals Association track these developments, which is part of why our technicians keep their training current. None of this disqualifies SmartKey — it simply means the hardware should be installed correctly and inspected over time, the same care we give every garage door lock and track.

Pro Tip From Our Mesa Locksmith Bench

In Arizona’s heat, the thing that quietly degrades a SmartKey cylinder is fine desert dust working into the keyway alongside thermal expansion. When we get called for a lock that “won’t take the rekey,” roughly half the time the cylinder is gritty rather than broken. Our pro tip: before reprogramming, exercise the lock with the working key a dozen times and apply a dry graphite or PTFE lubricant — never an oil-based spray, which traps dust and gums the wafers. If the action is still sticky, that is the signal to call us for a professional rekey or cylinder service rather than forcing the tool. We would always rather inspect a cylinder than replace one you did not need to.

Frequently Asked Questions

What does it mean to rekey a Kwikset SmartKey?
Rekeying resets the cylinder so a new key works and every old key stops working, all without removing the deadbolt from the door. The hardware stays; only the key pattern changes. It is the cleanest way to retire copies you cannot account for.
Do we need the original working key to rekey a SmartKey lock?
Yes. SmartKey is built so only someone with the current working key can reprogram the cylinder, which is a security feature, not a flaw. If the working key is missing, the lock cannot be reset the standard way and we typically swap the cylinder or change the lock instead.
Is a rekeyed SmartKey as secure as a brand-new lock?
A correctly rekeyed SmartKey deadbolt keeps its full BumpGuard and drill-resistance properties, so the security level does not drop. What matters is that the reset was completed fully so the cylinder holds the new pattern. We verify this with several test turns before we leave.
Can a SmartKey deadbolt join a master key system?
No. SmartKey cylinders are single-key by design and do not support a master-key hierarchy. For homes or businesses that need one key for staff and another for management, we recommend a traditional pin-tumbler master setup, which our commercial team installs across Mesa.
What if the SmartKey lock jams or rejects the tool?
A jam usually points to dust, debris, or a partially completed previous reset rather than a defective lock. Forcing the tool can lock the wafers in a stuck position. At that point we inspect the cylinder, clean and lubricate it properly, and rekey or replace only what is needed.
Should we rekey it ourselves or call a Mesa locksmith?
Many homeowners handle a single SmartKey reset on their own. When several doors must match one key, when the working key is lost, or when the cylinder feels gritty, a professional visit prevents a half-set lock later. We are glad to confirm your hardware and reprogram it correctly the first time.

Taking Control of Who Holds Your Keys in Mesa

The whole point of rekeying a Kwikset SmartKey is control: you decide which key opens your door today, without throwing away hardware that is already built to a Grade 1 standard. Done right, the cylinder forgets every old copy and answers only to the key in your hand. Done in a hurry, a half-finished reset can leave you locked out later — which is the situation we would rather help you avoid entirely. If you are also weighing a full security refresh, our guide to upgrading your deadbolt and handleset pairs naturally with this one.

When you want it handled correctly, our owner-operated shop has served homes and businesses across the East Valley, and you can reach out to our Mesa team to schedule a professional rekeying service. Call Locksmith Near Me Mesa at (480) 418-7560, see our work and reviews on our Google Business listing, and stop by the same Google Maps location to confirm you are working with the local team that knows SmartKey hardware inside and out. Let us reprogram your SmartKey properly and put your keys back where they belong — with you.
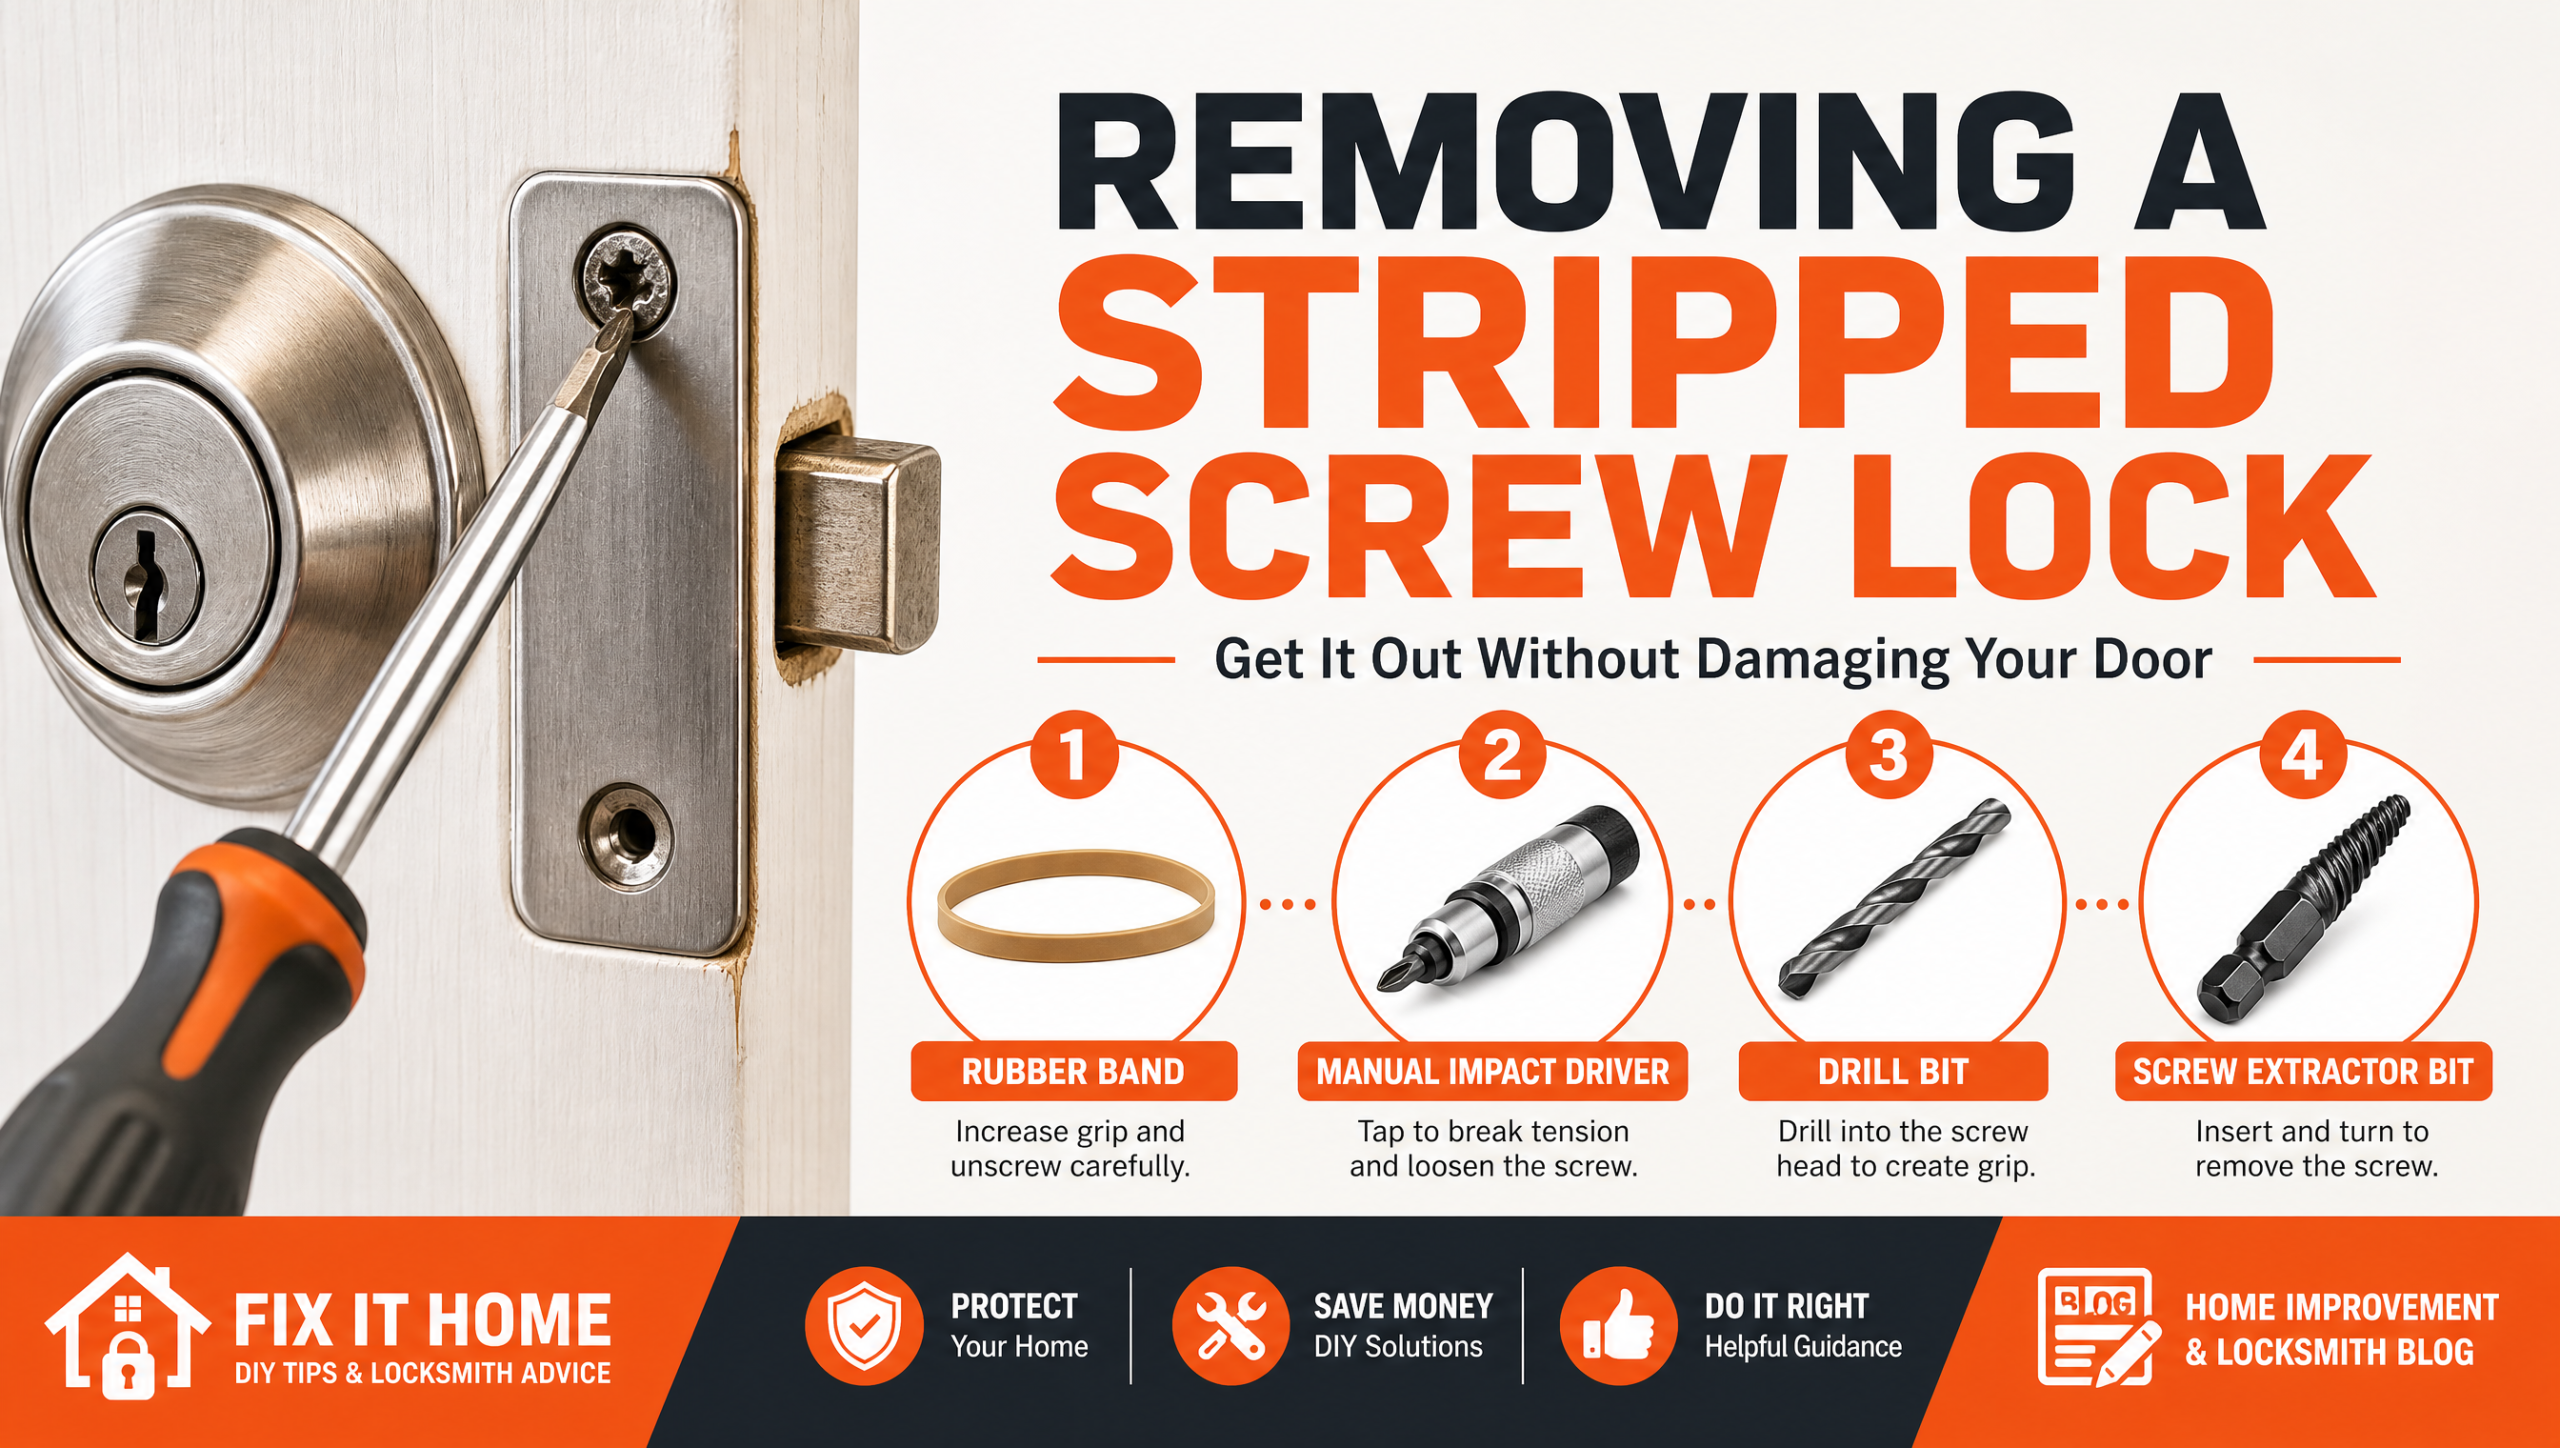
Infographic banner showing tools and steps for removing a stripped screw from a door lock

Removing a Stripped Screw Lock: How to Get It Out Without Damaging Your Door

A screwdriver that spins uselessly inside a rounded-out screw head is one of the most frustrating problems a homeowner runs into when a deadbolt or door handle needs attention. The fastener will not back out, the head is chewed flat, and forcing it harder only risks gouging the door or cracking the lock housing. The good news is that with the right grip, the correct bit, and a steady hand, a stripped fastener almost always comes free without harming the hardware around it. Below, our Mesa team walks through the exact field methods we trust, so read on before you reach for a power drill.

Removing a stripped screw lock comes down to restoring grip on a rounded head — a rubber band for traction, a manual impact driver, a left-handed drill bit, or a screw-extractor set — and then backing the fastener out under control while shielding the lock face and the surrounding door from scratches and burrs.

Why Lock Screws Strip in the First Place

A stripped screw is rarely bad luck. It usually traces to a mismatched driver — a Phillips tip seated in a square or combination head — or to overtightening that rounds the cross slots. Residential hardware compounds the problem because many face screws are soft brass that deforms under modest force. Add the heat-and-dust cycles Mesa hardware endures, and a fastener that was snug at installation can seize against corroded threads. Each removal attempt with the wrong tool shaves a little more metal until the driver has nothing left to bite.

This matters for more than convenience. A loose or seized screw on a strike plate, a thumbturn lock, or a handleset undermines the alignment the bolt depends on, which weakens overall deadbolt security. If you are servicing entry hardware, our residential locksmith team in Mesa handles these repairs without sacrificing the door security you rely on every day.

The Tools That Actually Work

You do not need a workshop to free a stripped screw. A handful of low-impact methods solve most cases.

Grip and Traction Fixes

The simplest trick is a wide rubber band. Lay it flat over the damaged head, press your driver firmly into it, and turn with steady downward pressure. The rubber fills the worn slots and bites where bare steel slips. A dab of valve-grinding compound or even fine abrasive cleanser between bit and head does the same thing through grit.

Mechanical Removal

When traction is not enough, step up to mechanical leverage. A manual impact driver — a hand tool you strike with a mallet — converts a hammer blow into a sharp rotational twist that breaks a frozen fastener loose without chewing the head further. If the screw still refuses, a left-handed drill bit (one that cuts counterclockwise) often grabs and reverses the screw as it bores. The dedicated solution is a screw-extractor set, a tapered, reverse-threaded bit that digs into a pre-drilled pilot hole and winds the fastener out. For any screw head standing proud of the surface, locking pliers clamped tight to the shoulder give you direct turning force.

Step-by-Step Method for Removing a Stripped Screw Lock

Work through these stages in order and stop once one of them works.

  1. Clear and assess. Wipe the head clean, identify the original drive type, and confirm the screw is not painted or glued in place.
  2. Try traction first. Seat the rubber-band method with firm, slow pressure before anything more aggressive.
  3. Apply controlled force. Move to the manual impact driver, striking squarely so the bit stays centered.
  4. Drill if needed. Switch to a left-handed bit or extractor only after traction and impact fail, drilling a shallow pilot at low speed.
  5. Back it out and inspect. Once the screw turns, remove it by hand, then check the threads in the door or jamb for damage before reinstalling.

The comparison below outlines how we match each method to the situation in the field.

Removal Method How It Works Best Used When Risk to Lock & Door
Rubber band Fills worn slots to restore driver grip Head is lightly rounded Very low
Abrasive grit / valve compound Adds friction between bit and head Smooth, polished screw heads Very low
Manual impact driver Hammer blow becomes a sharp turning twist Screw is frozen but head is intact Low
Locking pliers / vise grips Clamps the shoulder for direct leverage Screw head stands proud of the surface Low
Left-handed drill bit Counterclockwise bit grabs and reverses screw Head is too worn for any driver Moderate
Screw-extractor set Reverse-threaded bit winds out a pilot-drilled screw Head is destroyed or recessed Moderate
Rotary-tool slot + flathead Cuts a fresh straight slot for a flat driver Accessible head with room to cut Moderate to high
Penetrating lubricant soak Breaks down corrosion binding the threads Corroded or weather-seized screws Very low
Professional extraction Specialty tools, thread inserts, replacement hardware Snapped, flush, or security-door screws Minimal under expert handling

Protecting the Lock and Door From Damage

The removal method matters less than the care you take around it. Mask the lock face and the door with painter’s tape so a slipped bit leaves no scratch, and cut a cardboard shield to catch metal shavings before they grind into the finish. Keep any drill at its lowest speed: high RPM overheats soft brass and widens the hole you are trying to save. Vacuum filings as you go, because loose grit works its way into the cylinder and can compromise the very deadbolt installation you are protecting. If a thread tears out, a slightly longer or larger-gauge replacement screw usually restores a solid bite without a full hardware swap.

Pro Tip From the Field

After more than a decade pulling seized fasteners out of Mesa door hardware, here is the lesson that saves the most locks: match the driver to the screw before the first turn, and let the tool do the work. Most strips we repair were created by a driver one size too small forced at an angle. We keep a magnetic, multi-bit driver on every truck and seat the bit fully before applying pressure, never at a tilt.

One more field habit — a single drop of penetrating lubricant worked into a corroded thread, then left to soak while you set up your tools, loosens far more screws than brute force ever will. The same patience we bring to rekeying locks applies here: small, deliberate moves protect the hardware, and that discipline is what keeps a repair from turning into a replacement. It is the same care we describe in our guide to removing a stubborn key retainer on a padlock.

When a Professional Locksmith Should Take Over

Some situations move past a DIY fix. A screw that has snapped flush, a stripped thread inside a metal jamb, a high-security cylinder, or a thumbturn lock that no longer seats squarely all call for a trained hand. A professional locksmith in Mesa carries extraction tools, thread inserts, and replacement hardware that a household toolbox does not, and we follow the workmanship standards published by the Builders Hardware Manufacturers Association and the Associated Locksmiths of America. Forcing a damaged fastener on a security door risks the alignment that protects your home, and a botched removal often turns a minor fix into a full hardware replacement. When the hardware is already worn, our team can advise on a clean high-security lock and key upgrade rather than nursing a failing assembly.

Frequently Asked Questions

What is the easiest way to start removing a stripped screw lock?
Begin with the lowest-risk method: lay a wide rubber band over the damaged head, press your driver in firmly, and turn with steady downward pressure. The rubber fills the worn slots and restores enough grip to free a lightly rounded screw without any drilling.
Will drilling out a stripped screw damage my lock?
It can if done carelessly. Mask the lock face with painter’s tape, run the drill at its lowest speed to avoid overheating soft brass, and use a shield to catch metal shavings. Drilling should be a later step, used only after traction and impact methods fail.
Why do screws on door locks strip so often?
Most face screws on residential hardware are soft brass, and a mismatched or undersized driver rounds the head with little effort. Overtightening and corrosion from heat and humidity cycles make the threads seize, so each attempt with the wrong tool shaves away a little more metal.
Does a stripped screw affect my deadbolt security?
Yes. A loose or seized screw on a strike plate, handleset, or thumbturn lock throws off the alignment the bolt depends on. That play weakens how the deadbolt holds in the frame, which is why a stripped fastener on entry hardware is always worth correcting.
What tool removes a screw with a completely destroyed head?
A screw-extractor set is the dedicated solution. You drill a small pilot hole into the head, then thread the reverse-cut extractor bit in until it grabs and winds the fastener out. A left-handed drill bit often achieves the same result in one step on softer screws.
When should I call a professional locksmith instead?
Call a professional when a screw has snapped flush, the thread has torn out of a metal jamb, or the hardware is a high-security cylinder. A trained locksmith has extraction tools, thread inserts, and replacement parts that protect the alignment and home safety of a security door.

Keep Your Mesa Door Hardware Solid and Secure

A stripped screw looks like a small annoyance, yet it sits at the exact point where your hardware meets your door — the difference between a bolt that holds and one that rattles loose. The methods above free most fasteners without a mark, and the right follow-up keeps your home safety intact. If a screw has you stuck, or you would simply like a trained set of eyes on your entry hardware, let our certified technicians audit your doors and reinforce every weak point. You can learn more about our team, browse our full residential locksmith services, and reach out through our contact page to schedule a security audit or hardware installation. Find us and read verified reviews on our Google Business listing, then call Locksmith Near Me in Mesa to protect the door that protects everything behind it.

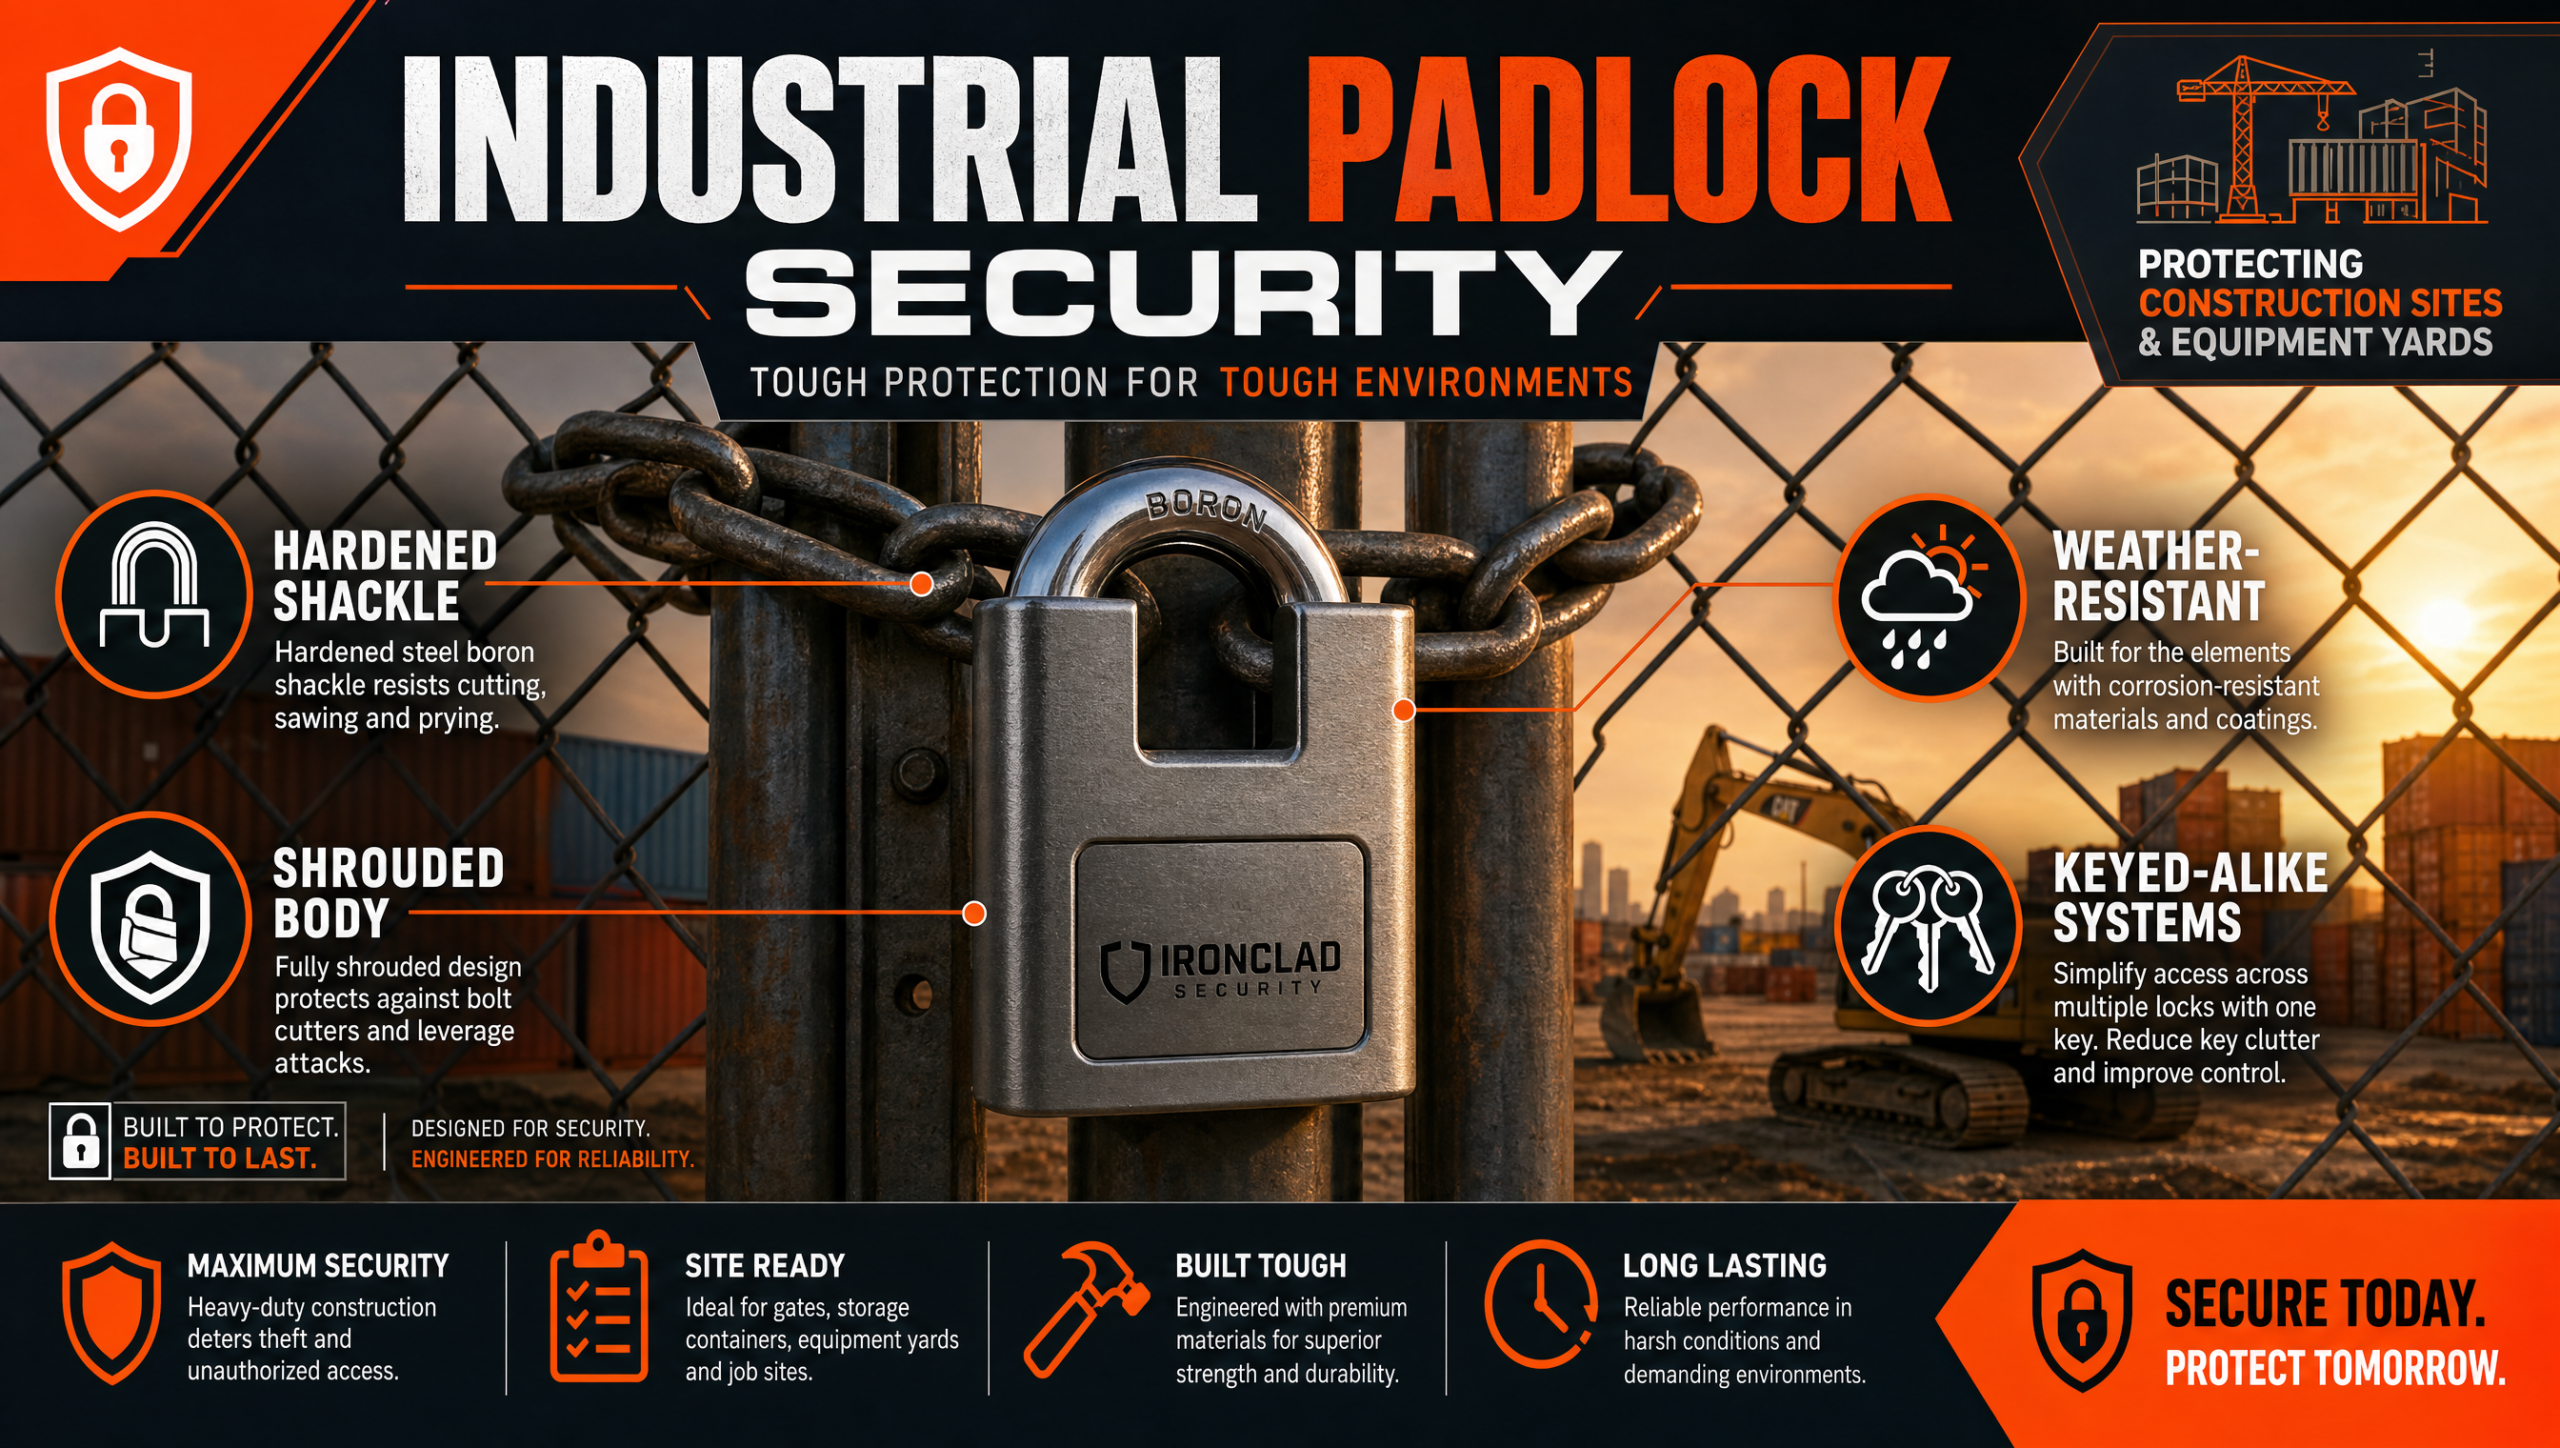
High-security industrial padlock locking a construction yard gate in Mesa, Arizona

Industrial Padlock Security: High-Security Padlocks for Construction Sites and Yards

A contractor walks onto the job site and finds the gate chain cut, a generator gone, and copper wire stripped from the equipment trailer. Standard hardware-store locks invite exactly this kind of loss, because their soft shackles and exposed bodies give bolt cutters and pry bars an easy target. The answer is purpose-built industrial padlock security: hardened, shrouded, weather-tested locks engineered for outdoor abuse. As a Mesa-based team with more than a decade securing yards across the East Valley, we want to walk you through what truly protects a site, so read on.

Industrial padlock security relies on three things: a hardened boron-alloy shackle that resists cutting, a shrouded or shielded body that blocks pry and impact attacks, and a corrosion-rated finish built for outdoor exposure. Pairing the right padlock grade with keyed-alike management is what keeps construction sites and storage yards protected.

Why Construction Sites and Yards Are Targets

Open lots, perimeter fencing, and high-value equipment make construction sites and equipment yards a standing invitation for theft. The National Insurance Crime Bureau reports that heavy equipment and tool theft ranks among the heaviest losses the construction industry absorbs, and most of those losses trace back to a single weak point: the lock on the gate, the gang box, or the conex container.

Thieves rarely pick locks on a job site. They cut them. A pocket-size bolt cutter defeats a brass shackle in one squeeze, and a long pry bar can shear a thin lock body off its hasp. That is why our commercial locksmith team treats site security as a system rather than a single product. The padlock is the front line, but the hasp, the chain, and the key management plan all matter just as much.

What Makes Industrial Padlock Security Different

A genuine industrial padlock is built around attack resistance, not convenience. Three engineered features separate it from a discount-bin lock.

Hardened Shackles and Shrouded Bodies

The shackle is the U-shaped loop most people grab first. Industrial models use boron-alloy or hardened steel shackles that dull and damage cutting blades instead of yielding to them. Better still, a shrouded padlock encloses most of the shackle inside a thick steel collar, leaving almost nothing for a cutter to grip. We see this design on manufacturers like ABUS, and we cover its real-world quirks in our guide on removing the Z-bar retainer on an ABUS padlock.

Weather and Corrosion Resistance

Mesa heat punishes hardware. A lock that seizes in dust and high temperatures is as useless as one that gets cut. Industrial padlocks carry sealed cylinders, brass or stainless internals, and weatherproof boots so the mechanism keeps turning after heavy exposure on a fence line. When a cylinder does fail in the field, our high-security lock and key service can rebuild or replace it without scrapping the whole assembly.

Choosing the Right Padlock Grade for Your Site

Not every gate needs the same lock. A tool cage inside a fenced yard faces a different threat than a street-facing entry gate. Matching the grade to the exposure keeps you protected without over-buying. The comparison below reflects how we spec hardware for clients across Mesa and the East Valley.

Padlock Grade Best Use On Site Shackle & Body Cut Resistance Weather Rating
Standard Brass Low-risk interior cages Exposed brass shackle Low Basic
Hardened Steel General gates & gang boxes Hardened steel shackle Moderate Coated, dust-sealed
Boron-Alloy Shrouded Perimeter & container doors Boron shackle, shrouded body High Sealed, corrosion-rated
High-Security Restricted Main entry & high-value yards Shrouded body, restricted keyway Very High Marine-grade sealed

The grade you choose should also account for key control. A site running ten gates with ten different keys becomes unmanageable, which is why we often set up keyed-alike or master-keyed systems and handle business re-keying when crews rotate. If a key ever goes missing, you can read more about duplicating high-security keys and why those blanks are deliberately restricted.

Pro Tip From the Field

After years of pulling cut locks off Mesa gates, here is the lesson that surprises most site managers: the padlock is rarely the weak link once you upgrade it. The hasp is. We have replaced dozens of premium padlocks that survived an attack while the bargain hasp they hung on was peeled away with a crowbar. Spec a welded, concealed-screw hasp rated to match the lock, and back the gate chain with a hardened, case-protected chain rather than a hardware-store loop. A lock is only as strong as the steel it secures, and a commercial lock change that ignores the mounting hardware leaves the door half open.

Layering Padlocks With Access Control

Padlocks guard the perimeter, but the most secure yards add a second layer at the office trailer and storage container. A keypad lock on the trailer door removes shared physical keys from the equation, and a full access control system logs who enters and when. For the trailer’s main door, a commercial-grade deadbolt adds real holding power — the same deadbolt installation and thumbturn hardware we fit on homes scales up to job-site offices. The principle behind strong home safety and strong site security is identical: remove the easy entry point before anyone tests it.

We also recommend securing on-site cash boxes and document safes; if one ever jams or the combination is lost, our safe service handles it without destroying the unit. And when a crew needs to rotate a single padlock instead of buying new, our walkthrough on how to re-key a padlock shows the process step by step.

Frequently Asked Questions

What makes a padlock “industrial” instead of standard?
An industrial padlock uses a hardened boron-alloy or steel shackle, a shrouded or shielded body that resists prying, and a sealed, corrosion-rated cylinder built for outdoor exposure. Standard brass locks have none of these, which is why they fall to bolt cutters.
Will a high-security padlock survive Mesa heat and dust?
Yes. Industrial padlocks carry sealed cylinders and weatherproof boots that keep the mechanism turning after heavy exposure on a fence line. Our technicians can service or rebuild a cylinder in the field if dust ever works its way in.
Can multiple gates share one key?
They can. We set up keyed-alike and master-keyed systems so a single key opens every gate you authorize, and we re-key the system whenever crews rotate or a key goes missing.
Is the padlock or the hasp the real weak point?
Once the padlock is upgraded, the hasp usually becomes the weakest link. A welded, concealed-screw hasp rated to match the lock is essential, because a premium padlock on a bargain hasp can still be peeled off with a pry bar.
Should I add access control as well as padlocks?
For office trailers and storage containers, yes. Keypad locks and access control systems remove shared physical keys and log who enters, layering electronic control on top of the mechanical protection your padlocks provide at the perimeter.
Can our team service padlocks instead of replacing them?
Often, yes. A padlock with a working body can be re-keyed rather than discarded, which keeps your hardware standardized. Our technicians assess the lock and recommend service or replacement based on its condition and your security needs.

Lock Down Your Mesa Job Site the Right Way

Equipment theft does not announce itself, and the gap between a cut brass lock and a shrouded industrial padlock is the gap between a secured site and a stripped one. If you manage a site or yard around the Valley, let our certified technicians audit your gates, hasps, and containers and spec hardware that matches the real threat — the same field-tested approach we describe in our piece on heavy-duty door closers and wind resistance. You can learn more about our team, review the full range of services we bring to commercial clients, and reach out through our contact page to schedule a security audit. Find us and read verified reviews on our Google Business listing, then call Locksmith Near Me to protect what your crew works hard to build.

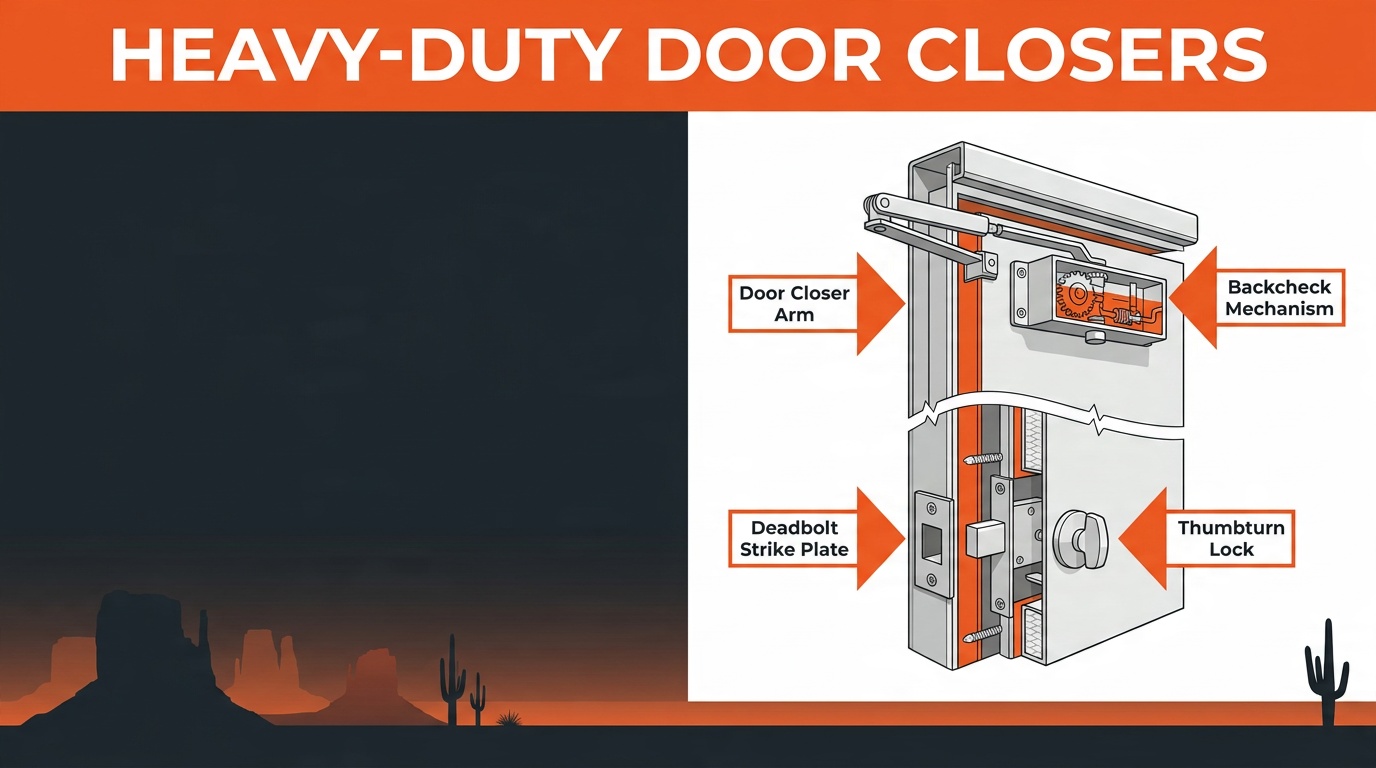
Infographic showing heavy-duty door closer components for commercial wind resistance in Mesa AZ

Heavy-Duty Door Closers: Why Your Business Needs Wind-Resistant Hardware

Every commercial property owner in Mesa, Arizona knows what a powerful desert gust can do to an uncontrolled door. One strong surge of wind swings the entry wide open, slams it back against the stop, stresses the frame, and — over time — quietly destroys the latch geometry that keeps your business locked at night. Heavy-duty door closers engineered for wind resistance are the hardware solution that stops this damage chain before it starts. Keep reading and we’ll walk you through how these systems work, how they protect your building’s overall security, and what to look for before buying.

What Separates a Standard Door Closer From a Heavy-Duty Door Closer

A standard residential closer is built for one purpose: pulling a lightweight interior door shut after someone walks through. It is not rated for exterior commercial doors, high-traffic cycles, or wind loading — and asking it to perform that job is how frame damage and latch failures begin.

Heavy-duty door closers are built to a completely different specification. The ANSI/BHMA hardware standards grade door closers on a Size 1 through 6 scale. Size 1 handles lightweight interior doors in low-traffic environments. Size 6 — the top of the range — handles massive fire-rated commercial doors in exposed exterior locations with engineered wind resistance built directly into the hydraulic mechanism.

Three features distinguish heavy-duty units in practice:

Hydraulic valve control: Adjustable closing speed, latching speed, and backcheck tension are all critical for managing a door under wind load. Without them, a gust dictates the door’s behavior — not the hardware.

Backcheck function: This acts as a hydraulic shock absorber, decelerating the door dramatically before it reaches its maximum open position. Without backcheck, a strong wind simply tears the door — and often the closer arm — off the frame.

Cycle ratings: A standard closer may carry a 250,000-cycle rating. Commercial-grade units from manufacturers like LCN Door Controls and ASSA ABLOY exceed one million cycles — because a busy commercial entry door reaches that volume.

When Wind Becomes a Deadbolt Security Issue

A door that repeatedly slams or blows open against its stop puts stress on every component in the assembly — including the deadbolt strike plate, the door frame, and the thumbturn lock on the interior side. That stress creates micro-fractures in the frame, loosens strike plate fasteners, and misaligns the latch over time — producing exactly the gap a forced-entry attempt exploits.

Our commercial locksmith team in Mesa encounters this pattern consistently: a business owner calls about a deadbolt that’s difficult to turn or a latch that no longer seats cleanly, and when we inspect the door, the root cause is not the lock — it is an undersized door closer that has allowed months of wind stress to silently degrade the frame and hardware around it.

Heavy-Duty Door Closer Comparison

Feature Standard Closer Heavy-Duty Closer Commercial Grade Closer
ANSI/BHMA Size Rating Size 1–3 Size 4–5 Size 5–6
Wind Resistance Low (interior only) Moderate–High (exposed doors) High (engineered exterior)
Cycle Rating ~250,000 cycles 500,000+ cycles 1,000,000+ cycles
Backcheck Function Rarely included Standard Standard + adjustable
Delayed Action No Optional Standard
ADA Opening Force Compliance Varies Adjustable to comply Yes — adjustable
Fire Door Compatibility No Often yes Yes — NFPA 80 compliant
Best Application Interior residential Commercial entry doors High-traffic exterior doors

Choosing the Right Heavy-Duty Door Closer for Your Property

Not every heavy-duty unit suits every commercial application. These are the variables that determine correct sizing:

Door weight and width: A 36-inch solid wood door and a 48-inch aluminum storefront door require different size ratings. Matching the closer to the door specification is the most critical decision in the selection process.

Exposure and wind direction: Doors directly exposed to prevailing wind need a higher backcheck rating than sheltered interior courtyard openings. In the Mesa area, the dominant wind patterns move from the southwest — doors with a southwest-facing exposure warrant close attention when sizing hardware.

ADA opening force limits: ADA standards cap interior door opening force at 5 lbf for accessibility compliance. Quality hydraulic closers can be adjusted to meet this threshold without giving up controlled closing performance.

Fire door rating: Many commercial exit doors carry an NFPA 80 fire-rated designation. That standard requires the door to close completely and latch under all conditions — including during a wind event. A closer that fails to consistently seat the latch is a code violation waiting to be flagged.

Pro Tip: If your commercial property is in a strip mall or shared building complex, the door closer you select may affect fire egress compliance for the entire unit — not just your suite. Before purchasing hardware independently, have a licensed Mesa locksmith inspect the full door assembly. A short inspection confirms the NFPA status, ADA requirements, and the correct closer size before any hardware is ordered. Getting that sequence wrong means pulling the unit back out and starting over.

How Door Closer Failures Undermine Deadbolt Security and Thumbturn Locks

Deadbolt security depends on the door sitting correctly in its frame. A BHMA Grade 1 deadbolt installed in a wind-damaged, misaligned frame is no longer operating at specification. The bolt throw may not fully seat in the strike box, or the clearance may have widened enough that the latch can be worked without a key.

The same principle applies to thumbturn locks on commercial interior doors — conference rooms, server closets, supply rooms. These components require the door to sit true. Once repetitive impact stress warps the frame, a thumbturn lock can bind, fail to latch, or lose the material contact that provides meaningful resistance to forced entry.

In many cases the fix is not a lock replacement. Correcting the closer to a properly rated unit, re-squaring the frame, and reinforcing the strike plate restores the deadbolt performance the property owner assumed they already had. Our professional locksmith services in Mesa, AZ include exactly this kind of door assembly audit — not just hardware sales.

Why Professional Locksmith Installation Makes the Difference

A heavy-duty door closer installed with the wrong arm geometry, incorrect spring tension, or a misaligned bracket defeats its own engineering. We have inspected commercial properties where a properly rated Size 5 unit was mounted in the wrong arm configuration — parallel instead of top-jamb — leaving the backcheck function completely disengaged.

ALOA-certified locksmiths are trained to evaluate the full door assembly: frame condition, door handing, fire rating, ADA compliance, and hardware compatibility. The installation requires reading the door, reading the environment, and calibrating the hydraulic adjustments to the specific conditions of that opening.

Our team at Locksmith Near Me Mesa approaches every commercial door closer installation as a full door security assessment. Find us on Google Maps to confirm our service area covers your property in the East Valley.

Frequently Asked Questions

Most standard commercial entry doors — 36 to 48 inches wide, solid wood or hollow metal construction — require a Size 4 or Size 5 closer under ANSI/BHMA standards. Doors in high-wind exposure locations, oversized fire doors, or high-traffic entrances typically require a Size 5 or 6. The correct size depends on door weight, width, and the specific environmental conditions of the opening. A licensed locksmith can verify the correct specification for your property before any hardware is purchased.

Yes — and it does so gradually. Repeated impact stress from an uncontrolled door loosens strike plate screws, micro-fractures wood door frames, and misaligns the latch over time. A deadbolt that once operated at BHMA Grade 1 tolerances can develop enough play in the strike that the bolt no longer fully engages. This compromises your lock’s rated security performance without any obvious signs of damage to the lock itself. A door assembly inspection identifies this before it becomes a vulnerability.

For doors along accessible routes, yes. ADA standards limit door opening force to 5 lbf on interior doors. Quality hydraulic door closers include adjustable spring tension that can be set to meet this threshold. The challenge is balancing ADA opening force compliance with enough closing power to fully seat the latch — especially on exterior doors with wind exposure. This balance is one of the key reasons professional installation matters: the hydraulic adjustments need to be dialed to both requirements simultaneously.

Backcheck is a hydraulic cushion built into the closer that decelerates the door sharply before it reaches its maximum open position. Without it, a strong wind gust — or a person pushing the door forcefully — drives it into the stop at full speed, stressing the frame, the hinges, and the closer arm itself. For any exterior commercial door or any door in a wind-exposed location, backcheck is not optional. On interior doors with heavy foot traffic, it also prevents damage from doors swinging into walls or adjacent fixtures.

Common signs include: the door fails to latch completely when released from midpoint, the arm struggles to pull the door closed against wind, the closer leaks hydraulic fluid (indicating internal wear from overwork), or the door slams shut faster than the latching speed adjustment can control. If any of these are present, the closer is likely undersized or at end of service life. A professional assessment will confirm the right replacement specification and identify any frame or strike damage that occurred while the undersized unit was in service.

Yes. NFPA 80 requires that every fire door assembly include a self-closing device capable of closing and latching the door from any open position, under all normal use conditions. This means the closer must have enough spring tension to seat the latch against the strike every single time — including during wind events that create negative pressure differentials across the opening. Not every commercial door closer carries the fire door listing required by NFPA 80. Our Mesa locksmith team verifies fire door compliance as part of every commercial door closer installation.

Secure Your Entry Points Before the Next Wind Event

Heavy-duty door closers are not a premium upgrade for Mesa commercial properties — they are a baseline requirement for any exterior door exposed to desert wind conditions. When the closer fails to control the door, every downstream component in your security stack begins absorbing damage that accumulates silently: the deadbolt strike loosens, the frame shifts, the thumbturn lock binds, and one day something fails at exactly the wrong moment.

If your business entry doors are currently running standard or light-commercial closers, this is the moment to schedule a hardware assessment. Our commercial locksmith services in Mesa, AZ include a full door assembly inspection, proper closer sizing, and professional installation with hydraulic adjustments calibrated to your specific opening. Contact Locksmith Near Me Mesa to get started, or visit our Google Maps listing to find us in the East Valley — your door hardware should be working with your security system, not undermining it.